Monday, June 17, 2013

Increase your productivity with F# scripts (part 2)

Last post we discussed a real world problem, cleanup your test environment after a complex integration test. We used a F# script to do the work.

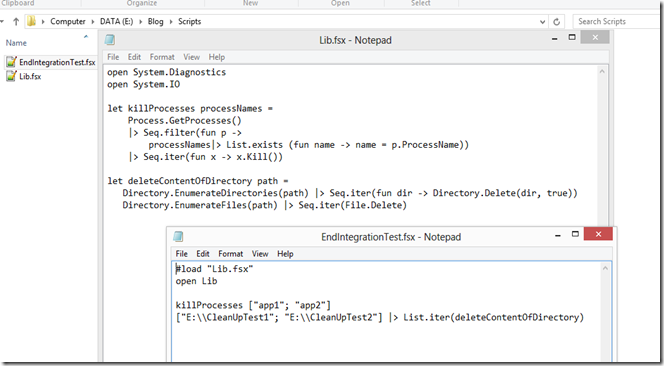
This time we look add more advanced scenario’s and solutions. First we want to split our script file into two files. One containing the scenario related code and one containing a library of facade function we want to reuse.

We start by creating a new script file in the Scripts directory calling it Lib.fsx and open the file with a text editor. Next we open also the script file we created last time and add the following lines of code:

#load "Lib.fsx"
open Lib 

The first line links the script file to the newly created Lib file. The second line opens the namespace “Lib”, the default namespace of the functions in the Lib script file.

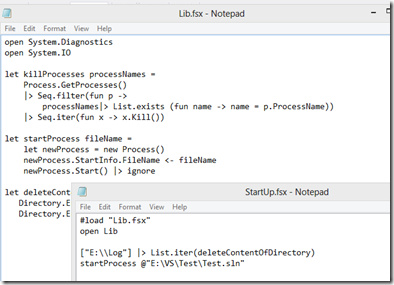
Next we move the facade functions (including the reference to the namespaces) to the Lib file.

SplitSource

After this refactoring everything still works the way it used to work.

Next want to create a startup script. Every time we start the laptop we want start with a clean log directory, we like a clean machine and second we want open a Visual Studio Solution so we can start coding immediately.

We start by creating a new script file called Startup.fsx and the following code:

#load "Lib.fsx"
open Lib

["E:\\Log"] |> List.iter(deleteContentOfDirectory)

Again we connect to Lib file and reuse the deleteContentOfDirectory function we created last time to clean the Log directory.

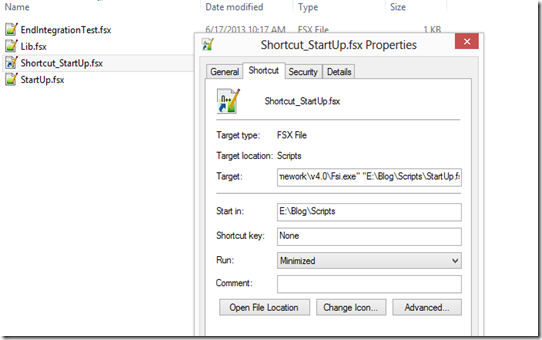
Next we create a new shortcut like we did the last time:

StartUp_Shortcut

This time linking it to the Startup script.

After testing the script we move the shortcut to the following directory:

C:\Users\YourAccountName\AppData\Roaming\Microsoft\Windows\Start Menu\Programs\Startup

  StartUp_3

After we restart our machine, the Log directory is cleaned.

There are other ways to associate scripts with the startup. You can use the group policy if your version of Windows has access to it (gpedit.msc):

LocalGroupPolicy_1

Next step is to open the Visual studio solution.

We add the following facade function to Lib.fsx

let startProcess fileName =
    let newProcess = new Process()
    newProcess.StartInfo.FileName <- fileName
    newProcess.Start() |> ignore

and the following line to the StartUp script

startProcess @"E:\VS\Test\Test.sln"

VS

the next time you start up the log directory is clean and your Solution will be directly available.

Adding extra functionality to the scripts is now a trivial activity.

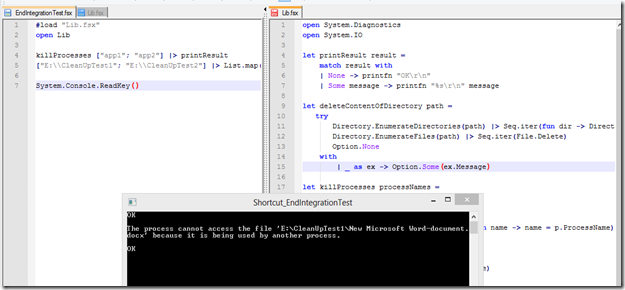
My Lib files contains, for example, exception handling and some reporting:

ExceptionHandling

This will not stop the script in case a file can not be deleted. The exception will be reported to the console.

There are a lot of activities that can be automated, I have scripts that:

  • Start programs like a mail client.
  • Creating zipped backups of source code.

In this way I can improve my productivity with F# scripting. How can F# scripting increase your productivity?

Thursday, June 13, 2013

Increase your productivity with F# scripts (part 1)


One of the many nice features of F# is its scripting capability. There are other scripting languages like PowerShell to improve your productivity on a Windows system. In this case you need to learn a new language and a new environment to automate some basic tasks. When you know F# and .NET you can leverage your skills, so let’s look at F# scripting.


A simple real-world problem

I once was responsible for integration testing a complex set of applications. After completing the test several applications were still running so these processes had to be stopped with the Task Manager and several directories had to be cleaned. How could F# help me to be more productive?

Let’s start by creating a directory called Scripts, add a new text file and rename it to EndIntegrationTest.fsx.

Create_EnIntegrationTest

open the file with your favorite text editor, I use Notepad++ in this case and 

add the line:

System.Diagnostics.Process.GetProcessesByName("app1") |> Seq.iter(fun x -> x.Kill())

This will “kill” all programs that are called app1 by first looking for all processes called app1 and next kill them one by one.

Create_EnIntegrationTest_1

I have set the Language menu to Caml to get some syntax highlighting.

Next we change the program associated with the file extension, right click:

ChangeProgramme

Look for another app on this PC (this is Windows 8) and look for the following directory:

C:\Program Files (x86)\Microsoft SDKs\F#\3.0\Framework\v4.0

Fsi

and select fsi.exe.

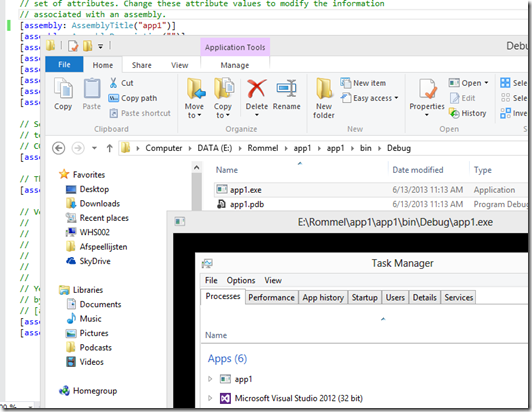
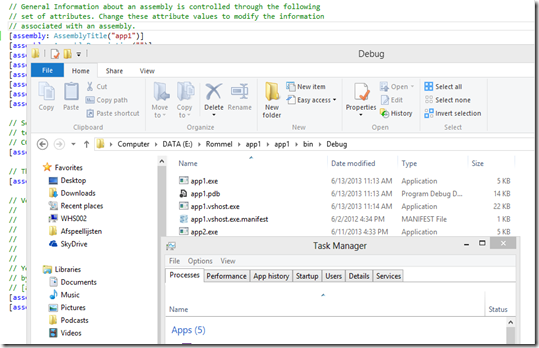
To test the script I created a C# console app and called it app1, start the executable in the debug directory

Before

Open the script file and app1 will be killed (R.I.P. app1).

After

This scripting solution has some drawbacks which we will discuss later, but it works. It matches the first rule of scripting:

Keep your scripts as simple as possible.

Scripts should increase your productivity and you should not spend much time on debugging or creating functionality you do not need (YAGNI –> You aren't gonna need it).

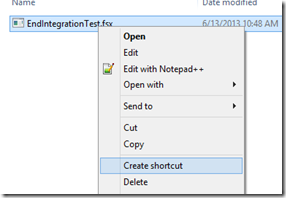
In case I want to kill app1 I have to go to the scripting directory. I can become more productive if I add a shortcut to my desk

CreateShortcut

rename it “Shortcut_EndIntegrationTest” and move it to the desktop.

Shortcut

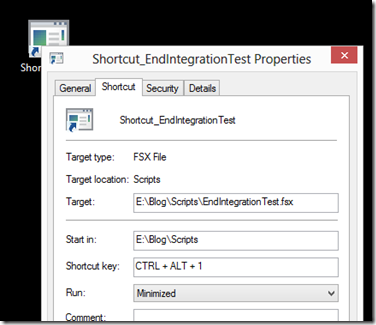
The next step is to change some of the properties of the shortcut, Shortcut key and Run, 

ShortcutProperties

After these changes all I have to do is press CRTL + ALT + 1 after the test is completed and the script runs without showing a console.

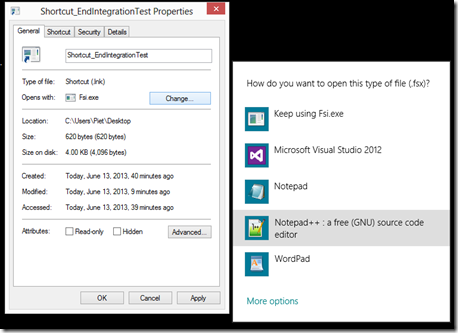
One of the drawbacks of the the created solution is that we have associated the .fsx extension with the fsi.exe. In this way we can run an F# script by accident when we just want to edit a file. With great power, comes great responsibility. We can fix this when associate the .fsx files with a text editor program and repair the shortcut. Also from a security perspective this is a better solution.

Go to General tab and associate .fsx with an editor

Notepadd

After apply the shortcut and all .fsx file will start the text editor.

Next change he target line to:

"C:\Program Files (x86)\Microsoft SDKs\F#\3.0\Framework\v4.0\Fsi.exe" "E:\Blog\Scripts\EndIntegrationTest.fsx”

ShortcutProperties

and the shortcut will kill app1 again (you need to repair the shortcut key and the run mode).

This script does not solve all our problems, we have to be able to kill multiple applications and we have to clean all polluted directories.

We could copy the line that killed the application and change the name of the app, but there is a second scripting rule:

Do not repeat yourself (DRY).

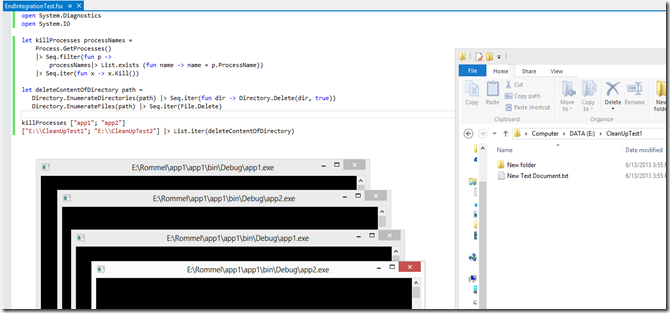
So we create a facade function killProcesses:

open System.Diagnostics

let killProcesses processNames =
    Process.GetProcesses()
    |> Seq.filter(
fun p ->
       
processNames|> List.exists (fun name -> name = p.ProcessName))
    |> Seq.iter(
fun x -> x.Kill())
   

and call it with a list of application name:

killProcesses ["app1"; "app2"]

this replaces the initial code.

killAll

CTRL + ALT + 1

and all are processes are killed.

Next we add the facade function to clean the directories:

let deleteContentOfDirectory path =
Directory.EnumerateDirectories(path) |> Seq.iter(
fun dir -> Directory.Delete(dir, true))
Directory.EnumerateFiles(path) |> Seq.iter(File.Delete)

We enumerate through all content in the directory, sub directories and files and delete them all. We use the facade function to clean all required directories:


["E:\\CleanUpTest1"; "E:\\CleanUpTest2"] |> List.iter(deleteContentOfDirectory)


Before:

CleanDirBefore 
After:
CleanDirAfter 

So we have solved our real-world problem.


Next time we improve our solution by putting the facade functions in a library and we look at startup scripts.


Update:At a windows machine not containing F# Script (REPL), you can add it yourself. Here are all the details: A step by step guide to installing an F# REPL environment on Windows by Matthew Adams.

Total Pageviews